

Rookie65
-
Posts
1136 -
Joined
-
Last visited
Content Type
Profiles
Forums
Gallery
Posts posted by Rookie65
-
-
I just save it on my desktop like the master plan file. Then when you go to open layout, use that one, then change as needed and save as the new project name.
-
Create a new layout sheet, put what you want on it, then save the layout as a master. Then with each new project, you save that layout to the project name, and your original stays ready for the next one. Then edit the job name, date, etc. Just like creating a master .plan file to generate new drawings from. You can also create them in different paper sizes so they are ready to go
-
Ask a licensed structural engineer. The geographic area is also critical for snow loading, if applicable
-
Did you try drawing it with the radius deck railing?
-
There is no home designer 17. Home designer uses years, chief architect uses X(numbers)
-
If you're using Chief Architect, best to post on that forum https://chieftalk.chiefarchitect.com
This is the site for their Home Designer software. Same parent company, different program capabilities.
-
You have the default floor as 5-1/2". If you click the edit button, you should be able to change it to a 4" thickness, all concrete slab. Then just check that your ceiling heights are what they should be
-
Try changing the walls the doors are in to "no room definition".
-
 1
1
-
-
A wall likely auto-rebuilt. Copy the window location, then check the walls to see if one or more says "Polyline produced by 3D wall editor." Delete it, and If you go too far, the wall you need will disappear. Then just just back up a step to put it back. Then you should be able to place the window you copied back. Sometimes the walls could be misaligned too. Without a plan to look at, it's just guesswork at this point
-
If you want layers, you'll need Chief Architect Premier. Otherwise, you'll need to copy your Home Designer plan as many times as you need to have different elements shown. You can send each of those pages with the elements on them to the same layout though, so the finished plan looks cleaner.
-
Home Designer .plan file
-
I don't think you can create one to add to that list. You can create a plan with all of the specifics you want in it, then save it as a master. Then when starting a new project, open that master plan, save it as the new project name, and make any changes for that particular job that you need to. Then your master will stay as you originally made it for the next one.
-
1
-
-
Do you have a ceiling thickness set up? If so, that would be where you'd put the ceiling material
-
I would suggest that you try posting your plan and maybe someone can help you. It's not something I could take on, as I am hitting the busy season and have my regular clients to design for. When you post your plan, be sure to note the location of the project, so maybe someone in your locality, or is familiar with the codes for your state, can work on it with you. You should also update your signature so people know which year and version of Home Designer it was originally drawn in. That will be important information to supply in order to get help.
-
Are you planning to pay someone to do this for you?
-
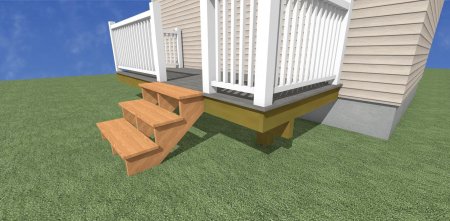
Deck Height
in Q&A
Draw the deck, go to the structure tab, and set floor height to a -6
-
1
-
-
Open your stair specification drop box. Under the "section heights" area, check "top tread" only and set it to "lock top". Then you can adjust the materials, etc. as needed. You should update your signature with the program version and type so everyone knows what you're working with
-
1
-
-
Are you doing manual or auto roofs? The reason you're seeing the tail is that likely you have roof framing showing in that view. You could also adjust the size of your eave trim. You can't edit just the rafter tails
-
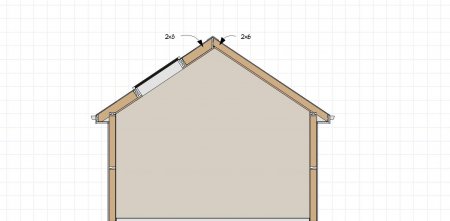
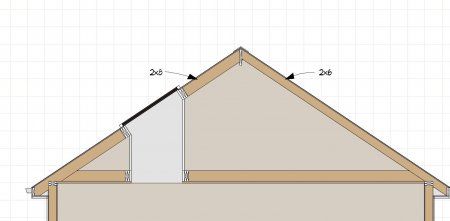
As I mentioned, build the roof at all 2x8. Then once built, change just the side that needs to be 2x6. Keep the ridge height the same for both roofs

-
Is this what you're looking to do?
-
Once the roofs are attached, open the roof plane that needs to change, and change the "structure" tab to the correct size rafters. If that doesn't work, and you are using auto roofs, change the framing to all 2x8, then turn auto build off, and manually change the framing of the roofs to 2x6 where needed. That will keep the ridge at the right height. You can also copy the ridge height of the matched roofs, then change the height of the 2x6 roofs to match that ridge.
-
If you placed the footings manually, copy them from the main level, then "paste-hold position" on the foundation level. Change the line style too, and you should be all set.
-
I don't believe that architectural would let you do any layouts. I believe Pro was the only one that could. Could search their website for the product comparisons. As of now, there is only Home Designer 2026. The individual versions have been done away with.
-
Use a terrain hole around the foundation wall around the stairs


Dimension Shortcut?
in Q&A
Posted
Do you have "temporary dimensions" turned on?